Very few people know about OP Auto Clicker which is the most popular mouse click automation utility that comes under the Auto Clicker. You might feel tired by performing continuous clicks. Even your fingers might injure or do not have that much of energy to perform mouse clicks.
Do you know? Many games are developed in way that they required continuous mouse clicks if you want to achieve victory. We can say these games belongs to incremental games also called as idle games. If we take an example of cookie clicker game which need higher rate of mouse clicks and for that you can use auto clicker for cookie clicker.
So, auto clicker helps the gamer to execute mouse clicks on faster rate but in automatic way. This is why it is called as an auto clicker. However, it is always suggested that to configure op auto clicker best settings to boost your mouse click rate so that it can perform well in any continuous clickable tasks.
You can also follow a few general tips to make sure your op auto clicker is set up to fulfill your particular needs and requirements. There is no one-size-fits-all answer to this question, since op auto clicker best settings vary according to your needs. Well, you don’t need to be panic on how you can configure the setting in OP Auto Clicker. In this post, you all will see all the information about op auto clicker.
What is the Work of OP Auto Clicker?
An OP Auto Clicker work is to automate clicking tasks on your computer screen. Windows and Mac users can use it to automate repetitive tasks and simulate mouse clicks or keystrokes automatically. With Auto Clicker OP, you can perform clicks a thousand times in a row without using a finger!
This utility tool is perfect for anyone who requires to do a lot of clicking on their computers, such as gamers, graphic designers, testers, data entry users or even just regular users who want to automate and swift some of their tasks. OP Auto Clicker is easy to use and can be configured to fulfill your requirements.
Also Read: Auto Clicker For Chromebook 2022 – Best Settings and Advantages
Steps to Configure OP Auto Clicker Best Settings
“First, be sure to adjust the click rate to match the speed at which you want your clicks to be executed. If you need your clicks to be very fast, you’ll want to set the click rate to a higher number. Conversely, if you need your clicks to be slower, you’ll want to set the click rate to a lower number.
Second, be sure to adjust the number of clicks per sequence to match the number of clicks you need to be executed in a single sequence. If you only need a few clicks, you can set this number”.
Above are quick op auto clicker settings. However, you can follow the step-by-step guide to set up op auto clicker best setting to level up your experience.
Step 1. You need to have op auto clicker updated version that you get it from here. Step 2. Now, you need go into the download path where you will see the Auto Clicker 3.0 exe file.
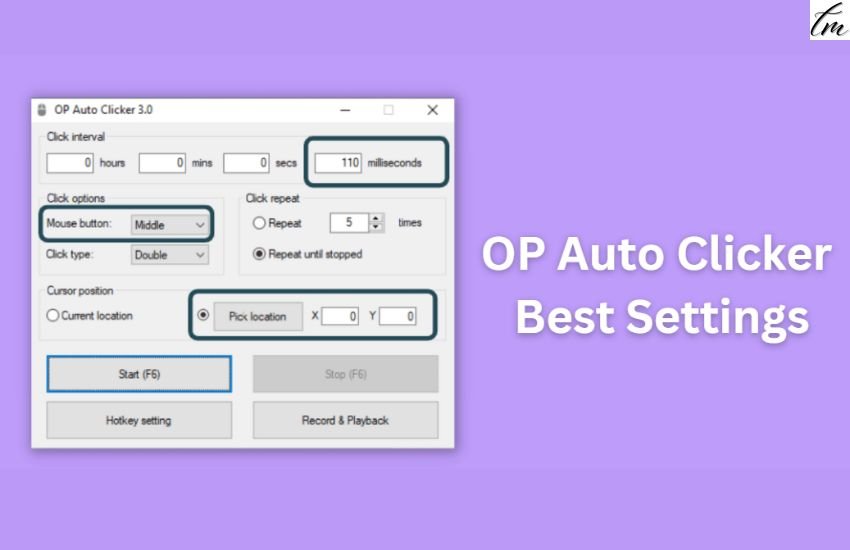
Step 2. Please double click on the OPAUTOCLICKER3 file and it will open autoclicker window (UI). Screenshot attached below.
Step 3. Now it is time to take action in configuring op auto clicker.
Step 4. There is a section called Click Interval, it is a time duration between 2 clicks performed. You need to set time into the second, milliseconds, minutes and hours. You can set it to 100 and more millisecond if you need faster clicks. It is totally depending on you.
Step 5. Choose the Click Options such as Mouse Button or Click Type. If you want to perform Single Clicks then choose Singe or else you choose as Double. What button you want to press automatically? This option is also available for you.
Step 6. Set the Click Repeat option as per need. There are 2 sub-options. If you want to repeat mouse clicks 5 times the enter 5 in the Repeat option or you can go with the default option that is Repeat Until you stopped the running auto clicker. Step 6. Now, it will allow you to set the Cursor Position from the available module.
Either you can go with Current location means you first check where is your mouse pointer located on your computer screen. Do you need to perform mouse clicks on that location? Or you can pick the required location on your screen that will be in x and y directions.
Step 7. That is, it! You have successfully configured op auto clicker best setting and now you ready to go.
Step 8. OP Auto Clicker consists of 2 key modules also. 1. Hotkey Setting and 2. Record & Playback. Hotkey settings are user to customize the required key to start the op auto clicker. By default, it is assigned to F6. If you want to change. Just click on hotkey setting and the popup appears on your screen with customizable options.
You can press any required key on your keyboard and it will be your new hotkey to start and stop the auto clicker. The Record & Playback module works well. It will capture the mouse click activities on your Windows, MAC. If want to record, you need to click on Record & Playback button. Now again click on Red Dot to start recording.
Final Words
In this post, we have seen on how we can configure op auto clicker best setting to boost mouse clicks automatically. After configuring these setting, you will get the best performance while playing games or performing continuous clickable task. It will boost your work without manual effort. I hope you all find it helpful. You can also check frequently asked questions.